Showing posts with label root. Show all posts

Tuesday, February 28, 2017

How to Root Galaxy S4 LTE I9505 on Android 4 3 Jelly Bean Firmware


The LTE version of Samsung Galaxy S4 with model number GT-I9500 has officially received the Android 4.3 Jelly Bean update. The new official firmware is currently available as an Over-The-Air (OTA) update as well as through Samsung KIES.

Samsung Galaxy S4 I9505 users who have already updated their devices with Android 4.3 Jelly Bean, may root their devices using the tutorial below.

This tutorial uses CF-Auto-Root file released by Elite Recognized XDA Developers, Chainfire. The CF-Auto-Root file allowing Galaxy S4 users to root their devices easily without depending on the firmware. It completely supports Android 4.3 Jelly Bean and future firmware as well. Head over to the CF-Auto-Root main thread to learn more about the root method.

Disclaimer: Rooting voids the warranty of your device. We and the developer of this rooting procedures shall not be held responsible if any undesirable outcomes may happen to your device. use of this root guide is solely at your own risk!

Pre-requisites
1. Install USB Drivers for Samsung Galaxy S4 on the computer.
2. Enable USB Debugging Mode on the phone by navigating to Settings >> Developer Options.
3. Make a backup of all your important data before following the guide.
4. The Galaxy S4 should be factory unlocked and not locked to any particular carrier.
5. Ensure the battery of the phone is charged more than 80 percent.
6. The CF-Auto-Root file works only on Samsung Galaxy S4 I9505. Applying this to any incorrect variant might brick the device. Verify the model number of the Galaxy S4 by navigating to Settings >> About Phone.

File Required
1. CF-Auto-Root for Galaxy S4 I9505 (CF-Auto-Root-jflte-jfltexx-gti9505.zip)
2. Odin 3.07

Steps to Root Galaxy S4 I9505 Running on Android 4.3 Jelly Bean Firmware
Step 1: Extract CF-Auto-Root and Odin 3.07 files using winrar/7zip/winzip or any other extracting tool.
Step 2: Switch off the Galaxy S4. Then boot the device into Download Mode by pressing and holding Volume Down, Home and Power buttons together until a construction Android robot icon with a warning triangle appears on screen. Now press the Volume Up button to enter Download Mode.
Step 3: Launch Odin on the computer as an Administrator.
Step 4: Connect the Galaxy S4 to the computer using USB cable while it is in the Download Mode. Wait until Odin detects the device. When the device is connected successfully, the ID: COM box will turn to light blue with the COM port number. Additionally, the successful connected will be indicated by a message saying Added.

Note: If the Added message does not appear, then try re-install USB drivers or changing the port on the computer.

Step 5: In Odin, click the PDA button and select the CF-Auto-Root-jflte-jfltexx-gti9505.tar.md5 file.
Step 6: Verify that Auto Reboot and F. Reset Time checkboxes are selected in Odin. Also, ensure the Re-Partition option is not selected.
Step 7: Double-check and click Start in Odin. The installation process will now begin.
Step 8: Once the installation process is completed, your phone will restart and soon you will see a PASS message with green background in the left-most box at the very top of the Odin. You can now unplug the USB cable to disconnect your device from computer.

Samsung Galaxy S4 I9505 running on Android 4.3 Jelly Bean firmware is now rooted successfully. You can now install any app that requires root permission. Verify the root status of the device by downloading Root Checker app from Google Play Store.

Thanks to all fellas at XDA who first tried out this rooting technique. This method was originally posted via XDA-Developers original thread.


Android Apk
Read More..

Wednesday, February 8, 2017

How to Root Galaxy S4 U S Cellular SCH R970 on Android 4 3 Jelly Bean Firmware


The U.S. Cellular subscribers of Samsung Galaxy S4 (SCH-R970) has started receiving Android 4.3 Jelly Bean update with firmware build number R970TYUEMJA. The new official firmware is currently available as an Over-The-Air (OTA) update as well as through Samsung KIES.

Samsung Galaxy S4 (U.S. Cellular) SCH-R970 users who have already updated their devices with Android 4.3 Jelly Bean, may root their devices using the tutorial below.

This tutorial uses CF-Auto-Root file released by Elite Recognized XDA Developers, Chainfire. The CF-Auto-Root file allowing Galaxy S4 users to root their devices easily without depending on the firmware. It completely supports Android 4.3 Jelly Bean and future firmware as well. Head over to the CF-Auto-Root main thread to learn more about the root method.

Disclaimer: Rooting voids the warranty of your device. We and the developer of this rooting procedures shall not be held responsible if any undesirable outcomes may happen to your device. use of this root guide is solely at your own risk!

Pre-requisites
1. Install USB Drivers for Samsung Galaxy S4 on the computer.
2. Enable USB Debugging Mode on the phone by navigating to Settings >> Developer Options.
3. Make a backup of all your important data before following the guide.
4. Ensure the battery of the phone is charged more than 80 percent.
5. The CF-Auto-Root file works only on the U.S. Cellular version of Samsung Galaxy S4 (SCH-R970). Applying this to any incorrect variant might brick the device. Verify the model number of the Galaxy S4 by navigating to Settings >> About Phone.

File Required
1. CF-Auto-Root for Galaxy S4 (U.S. Cellular) SCH-R970 (CF-Auto-Root-jflteusc-jflteusc-schr970.zip)
2. Odin 3.07

Steps to Root Galaxy S4 (U.S. Cellular) SCH-R970 Running on Android 4.3 Jelly Bean Firmware
Step 1: Extract CF-Auto-Root and Odin 3.07 files using winrar/7zip/winzip or any other extracting tool.
Step 2: Switch off the Galaxy S4. Then boot the device into Download Mode by pressing and holding Volume Down, Home and Power buttons together until a construction Android robot icon with a warning triangle appears on screen. Now press the Volume Up button to enter Download Mode.
Step 3: Launch Odin on the computer as an Administrator.
Step 4: Connect the Galaxy S4 to the computer using USB cable while it is in the Download Mode. Wait until Odin detects the device. When the device is connected successfully, the ID: COM box will turn to light blue with the COM port number. Additionally, the successful connected will be indicated by a message saying Added.

Note: If the Added message does not appear, then try re-install USB drivers or changing the port on the computer.

Step 5: In Odin, click the PDA button and select the CF-Auto-Root-jflteusc-jflteusc-schr970.tar.md5 file.
Step 6: Verify that Auto Reboot and F. Reset Time checkboxes are selected in Odin. Also, ensure the Re-Partition option is NOT selected.
Step 7: Double-check and click Start in Odin. The installation process will now begin.
Step 8: Once the installation process is completed, your phone will restart and soon you will see a PASS message with green background in the left-most box at the very top of the Odin. You can now unplug the USB cable to disconnect your device from computer.

Samsung Galaxy S4 (U.S. Cellular) SCH-R970 running on Android 4.3 Jelly Bean firmware is now rooted successfully. You can now install any app that requires root permission. Verify the root status of the device by downloading Root Checker app from Google Play Store.


Android Apk
Read More..

Wednesday, November 16, 2016

How to Root Galaxy S4 T Mobile SGH M919 on Android 4 3 Jelly Bean Firmware


The T-Mobile subscribers of the Samsung Galaxy S4 with model number SGH-M919 has started receiving the Android 4.3 Jelly Bean update. The new official firmware is currently available as an Over-The-Air (OTA) update as well as through Samsung KIES.

Samsung Galaxy S4 (T-Mobile) SGH-M919 users who have already updated their devices with Android 4.3 Jelly Bean, may root their devices using the tutorial below.

This tutorial uses CF-Auto-Root file released by Elite Recognized XDA Developers, Chainfire. The CF-Auto-Root file allowing Galaxy S4 users to root their devices easily without depending on the firmware. It completely supports Android 4.3 Jelly Bean and future firmware as well. Head over to the CF-Auto-Root main thread to learn more about the root method.

Disclaimer: Rooting voids the warranty of your device. We and the developer of this rooting procedures shall not be held responsible if any undesirable outcomes may happen to your device. use of this root guide is solely at your own risk!

Pre-requisites
1. Install USB Drivers for Samsung Galaxy S4 on the computer.
2. Enable USB Debugging Mode on the phone by navigating to Settings >> Developer Options.
3. Make a backup of all your important data before following the guide.
4. Ensure the battery of the phone is charged more than 80 percent.
5. The CF-Auto-Root file works only on the T-Mobile version of Galaxy S4 (SGH-M919). Applying this to any incorrect variant might brick the device. Verify the model number of the Galaxy S4 by navigating to Settings >> About Phone.

File Required
1. CF-Auto-Root for Galaxy S4 (T-Mobile) SGH-M919 (CF-Auto-Root-jfltetmo-jfltetmo-sghm919.zip)
2. Odin 3.07

Steps to Root Galaxy S4 (T-Mobile) SGH-M919 Running on Android 4.3 Jelly Bean Firmware
Step 1: Extract CF-Auto-Root and Odin 3.07 files using winrar/7zip/winzip or any other extracting tool.
Step 2: Switch off the Galaxy S4. Then boot the device into Download Mode by pressing and holding Volume Down, Home and Power buttons together until a construction Android robot icon with a warning triangle appears on screen. Now press the Volume Up button to enter Download Mode.
Step 3: Launch Odin on the computer as an Administrator.
Step 4: Connect the Galaxy S4 to the computer using USB cable while it is in the Download Mode. Wait until Odin detects the device. When the device is connected successfully, the ID: COM box will turn to light blue with the COM port number. Additionally, the successful connected will be indicated by a message saying Added.

Note: If the Added message does not appear, then try re-install USB drivers or changing the port on the computer.

Step 5: In Odin, click the PDA button and select the CF-Auto-Root-jfltetmo-jfltetmo-sghm919.tar.md5 file.
Step 6: Verify that Auto Reboot and F. Reset Time checkboxes are selected in Odin. Also, ensure the Re-Partition option is NOT selected.
Step 7: Double-check and click Start in Odin. The installation process will now begin.
Step 8: Once the installation process is completed, your phone will restart and soon you will see a PASS message with green background in the left-most box at the very top of the Odin. You can now unplug the USB cable to disconnect your device from computer.

Samsung Galaxy S4 (T-Mobile) SGH-M919 running on Android 4.3 Jelly Bean firmware is now rooted successfully. You can now install any app that requires root permission. Verify the root status of the device by downloading Root Checker app from Google Play Store.

Thanks to all fellas at XDA who first tried out this rooting technique. This method was originally posted via XDA-Developers original thread.


Android Apk
Read More..

Saturday, October 29, 2016

How to Root Galaxy S4 Sprint SPH L720 on Android 4 3 Jelly Bean Firmware


Samsung has recently released the Android 4.3 Jelly Bean update firmware with firmware build number L720VPUEMJA for the Sprint subscribers of Galaxy S4 with model number SPH-L720. The new official firmware is now available as an Over-The-Air (OTA) update as well as through Samsung KIES.

Samsung Galaxy S4 (Sprint) SPH-L720 users who have already updated their devices with Android 4.3 Jelly Bean, may root their devices using the tutorial below.

This tutorial uses CF-Auto-Root file released by Elite Recognized XDA Developers, Chainfire. The CF-Auto-Root file allowing Galaxy S4 users to root their devices easily without depending on the firmware. It completely supports Android 4.3 Jelly Bean and future firmware as well. Head over to the CF-Auto-Root main thread to learn more about the root method.

Disclaimer: Rooting voids the warranty of your device. We and the developer of this rooting procedures shall not be held responsible if any undesirable outcomes may happen to your device. use of this root guide is solely at your own risk!

Pre-requisites
1. Install USB Drivers for Samsung Galaxy S4 on the computer.
2. Enable USB Debugging Mode on the phone by navigating to Settings >> Developer Options.
3. Make a backup of all your important data before following the guide.
4. Ensure the battery of the phone is charged more than 80 percent.
5. The CF-Auto-Root file works only on the Sprint version of Samsung Galaxy S4 SPH-L720. Applying this to any incorrect variant might brick the device. Verify the model number of the Galaxy S4 by navigating to Settings >> About Phone.

File Required
1. CF-Auto-Root for Galaxy S4 (Sprint) SPH-L720 (CF-Auto-Root-jfltespr-jfltespr-sphl720.zip)
2. Odin 3.07

Steps to Root Galaxy S4 (Sprint) SPH-L720 Running on Android 4.3 Jelly Bean Firmware
Step 1: Extract CF-Auto-Root and Odin 3.07 files using winrar/7zip/winzip or any other extracting tool.
Step 2: Switch off the Galaxy S4. Then boot the device into Download Mode by pressing and holding Volume Down, Home and Power buttons together until a construction Android robot icon with a warning triangle appears on screen. Now press the Volume Up button to enter Download Mode.
Step 3: Launch Odin on the computer as an Administrator.
Step 4: Connect the Galaxy S4 to the computer using USB cable while it is in the Download Mode. Wait until Odin detects the device. When the device is connected successfully, the ID: COM box will turn to light blue with the COM port number. Additionally, the successful connected will be indicated by a message saying Added.

Note: If the Added message does not appear, then try re-install USB drivers or changing the port on the computer.

Step 5: In Odin, click the PDA button and select the CF-Auto-Root-jfltespr-jfltespr-sphl720.tar.md5 file.
Step 6: Verify that Auto Reboot and F. Reset Time checkboxes are selected in Odin. Also, ensure the Re-Partition option is NOT selected.
Step 7: Double-check and click Start in Odin. The installation process will now begin.
Step 8: Once the installation process is completed, your phone will restart and soon you will see a PASS message with green background in the left-most box at the very top of the Odin. You can now unplug the USB cable to disconnect your device from computer.

Samsung Galaxy S4 (Sprint) SPH-L720 running on Android 4.3 Jelly Bean firmware is now rooted successfully. You can now install any app that requires root permission. Verify the root status of the device by downloading Root Checker app from Google Play Store.

Thanks to all fellas at XDA who first tried out this rooting technique. This method was originally posted via XDA-Developers original thread.


Android Apk
Read More..

Wednesday, October 5, 2016

How to Root Galaxy S3 Sprint SPH L710 on Android 4 1 2 Jelly Bean Firmware


Samsung has released its latest official Android 4.1.2 Jelly Bean update firmware for the Sprint subscribers of Galaxy S3 with model number SPH-L710. The firmware is now available as Over-The-Air (OTA) update for the users.

Samsung Galaxy S3 (Sprint) SPH-L710 users who have already updated their devices with Android 4.1.2 Jelly Bean, may root their devices using the tutorial below.

This tutorial uses CF-Auto-Root file released by recognised XDA Developers, Chainfire. The CF-Auto-Root file allowing Galaxy S3 users to root their devices easily without depending on the firmware. It completely supports Android 4.1.2 Jelly Bean and future firmware as well.

Disclaimer: Rooting voids the warranty of your device. We and the developer of this rooting procedures shall not be held responsible if any undesirable outcomes may happen to your device. use of this root guide is solely at your own risk!

Pre-requisites
1) Install USB Driver for Samsung Galaxy S3 on the computer.
2) Enable USB Debugging Mode on the phone by navigating to Settings >> Developer Options (Android 4.0 or later) or go to Settings >> Applications >> Development (Android 2.3 or earlier).
3) Make a backup of all your important data before following the guide.
4) Ensure the battery of the tablet is charged more than 80 per cent.
5) The CF-Auto-Root file works only on Samsung Galaxy S3 (Sprint) SPH-L710 running on Android 4.1.2 Jelly Bean firmware. Applying this to any incorrect variant might brick the device. Verify the model number of the Galaxy S3 by navigating to Settings >> About Phone.

File Required
1. CF-Auto-Root (Mirror Link) for Galaxy S3 (Sprint) SPH-L710 (CF-Auto-Root-d2spr-d2spr-sphl710.zip)
2. Odin 3.07

Steps to Root Galaxy S3 (Sprint) SPH-L710 Running on Android 4.1.2 Jelly Bean Firmware
Step 1: Extract CF-Auto-Root and Odin 3.07 files using winrar/7zip/winzip or any other extracting tool.
Step 2: Switch off the Galaxy S3. Then boot the device into Download Mode by pressing and holding Volume Down, Home and Power buttons together until a construction Android robot icon with a warning triangle appears on screen. Now press the Volume Up button to enter Download Mode.
Step 3: Run Odin on the computer as an Administrator.
Step 4: Connect the Galaxy S3 to the computer using USB cable while it is in the Download Mode. Wait until Odin detects the device. When the device is connected successfully, the ID: COM box will turn blue with the COM port number. Additionally, the successful connected will be indicated by a message saying Added.
Note: If the Added message does not appear, then try re-install USB drivers or changing the port on the computer.
Step 5: In Odin, click the PDA button and select the CF-Auto-Root-d2spr-d2spr-sphl710.tar.md5 file.
Step 6: Verify that Auto Reboot and F.Reset Time checkboxes are selected in Odin. Also, ensure the Re-Partition option is not selected.
Step 7: Double-check and click Start button in Odin. The installation process will now begin.
Step 8: Once the installation process is completed, your phone will restart and soon you will see a PASS message with green background in the left-most box at the very top of the Odin. You can now unplug the USB cable to disconnect your device from computer.

Samsung Galaxy S3 (Sprint) SPH-L710 running on Android 4.1.2 Jelly Bean firmware is now rooted successfully. You can now install any app that requires root permission. Verify the root status of the device by downloading Root Checker app from Google Play Store.

Thanks to all fellas at XDA who first tried out this rooting technique. This method was originally posted via XDA-Developers original thread.


Android Apk
Read More..

Sunday, August 7, 2016

root Triangle Away apk Fast Download

[root] Triangle Away apk
[root] Triangle Away apk

Current Version : 2.90
Requires Android : 2.3.3 and up
Category : Tools
Size : 267k

Original Post From http://apktoolsdownload.blogspot.com


[root] Triangle Away apk Description

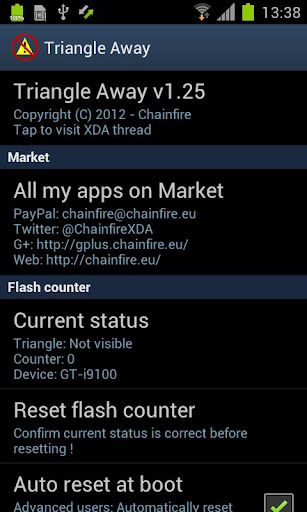
Many Samsung devices store a flash counter that keeps track of how many times you have flashed *custom* firmwares to your device. On some devices, a yellow triangle or other sort of visual warning is also displayed during boot if you are running a *custom* firmware. TriangleAway was built to disable the triangle (if a visual warning is present) and reset the custom ROM flash counter to 0. This app requires root !

You can find out the current status of your flash counter and firmware state (custom or official) by booting into "download mode" on most devices. The usual way of getting into "download mode" is by first turning off your device, then turning it on by pressing and holding VolDown+(Home)+Power. Alternatively, the "adb reboot download" command also often works.

When you run TriangleAway, if your device and firmware are supported, it will show you the detected state of the binary (custom or official) and flash counter value, and the option to "Reset flash counter". Please confirm that the information shown is correct before resetting the values.

On a number of devices, TriangleAway can work, but your firmware may not be supported directly. In that case, the app will tell you it needs to reboot into a special boot mode, which will be happen if you select "Reset flash counter". The device will reboot into a special mode which will allow you to review the current status and reset the binary and flash counter values (or abort and do nothing). On some devices this will actually trigger the counter to 1 if its 0 - so if you're "just checking", do that in download mode!

!!! THIS IS A DANGEROUS OPERATION AND COULD POTENTIALLY BRICK YOUR DEVICE. PROCEED AT YOUR OWN RISK. A USB JIG IS PREFERRED IF YOU HAVE A WORKING ONE !!!
( and by brick I mean brick - only a board replacement or a JTAG unit will be able to save you, don't mess with boot(loader) stuff unless you *really* mean it! )

Note#1: using Triangle Away may unmount your SD card. Reboot or manually remount it from Android settings.

Note#2: on new devices like the SGS3/SGNote2/SGNote10.1, status can only be reset on some firmwares - they must be stock firmwares!

Supported devices:

Samsung Galaxy S2:
- GT-I9100 **
- Sprint Epic 4G Touch **
- Korea SHW-M250K/L/S **

Samsung Galaxy Note:
- GT-N7000 **
- GT-I9220 **

Samsung Galaxy S3:
- GT-I9300/I9300T **
- USA: AT&T, Sprint, T-Mo, VZW (unlock bootloader !), USCC, MetroPCS, Cricket, CSpire
- Canada
- GT-I9305/I9305T/I9305N LTE **
- Korea SHV-E210K/L/S **
- Korea SHW-M440S **

Samsung Galaxy Note 2:
- GT-N7100/N7100T/N7102/N7105/N7105T **
- SPH-L900 Sprint **
- SGH-T889 T-Mobile **
- SGH-T889V Canada **
- SGH-R950 US Cellular **
- SGH-I317/M AT&T/Canada **
- SCH-I605 Verizon ** (unlock bootloader !)
- Korea SHV-E250K/L/S **

Samsung Galaxy Camera EK-GC100 **

Samsung Galaxy Note 10.1":
- GT-N8000 3G **
- GT-N801x Wi-Fi **
- GT-N8020 LTE **
- SHW-M480S/K/W **

Samsung Galaxy Tab 2:
- GT-P310x 7" 3G
- GT-P311x 7" Wi-Fi
- GT-P510x 10.1" 3G
- GT-P511x 10.1" Wi-Fi

Various:
- I8160, I8190
- I9070/P
- I9082
- I9260
- S7500, S7560, S7562

** Various models are supported depending on firmware, but only the exact models listed are supported regardless of firmware version.

Whether or not Triangle Away works may depend on your kernel, try flashing a different one if it doesn't work.

Please also note that some devices set the counter to 1 at every boot if you are running a custom kernel or recovery. On these devices, Triangle Away may always display 1 - make sure to check the counter in actual download mode.

For discussion and technical details, see the XDA-Developers.com thread here:

http://forum.xda-developers.com/showthread.php?t=1494114

Note that this download is also available from that thread completely for free. You can go there and download it for free, or buy me a beer and download it from Play. It is the same program.

I'm not sure about future updates - http://www.chainfire.eu/articles/118/Triangle_Away_vs_Samsung/


[root] Triangle Away apk Videos and Images


Visit us on http://apktoolsdownload.blogspot.com

download


Android Apk
Read More..

Thursday, August 4, 2016

GMD GestureControl รข˜… root apk Download

GMD GestureControl ★ root apk

Current Version : 6.3.1
Requires Android : 3.1 and up
Category : Tools
Size : 1.8M

Original Post From http://apkandroiddownloads.blogspot.com


GMD GestureControl ★ root apk Description

Control device with MULTITOUCH and MULTITASK gestures similar to iPad. Works in all applications. You can even hide status bar and enjoy full screen in your favorite games or while browsing.

"For those who tend to get tired of Android's status bar, or just want more intuitive gesture-based controls on their tablet, this app is definitely worth a shot." - Android Police

★ Try Lite version before you buy
★ Requires root access

★ Multitouch
★ Multitask - start any application, shortcut or custom action without leaving current application
★ Custom actions - LaunchPad, Start application, Previous Application, Next application, Home, Kill current application, Back, Forward, Recent application list, Recent application dialog, Menu, Notification Panel, Hide/Show status bar, Start launcher shorcut(bookmark, contacts, settings, etc), Start Tasker task, Pause gestures, Exit, Screen Off (lock), Alt+Tab, Music Play/Next/Previous, Volume, Search, Voice Search, Select Input Method.
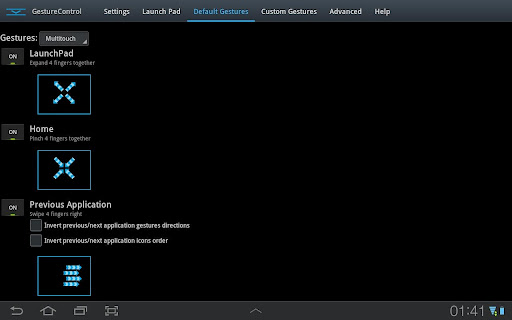
★ Swipe 4 fingers right - open previous application
★ Swipe 4 fingers left - open next application
★ Expand 4 fingers - LaunchPad (similar to SwypePad, start any application, shortcut or custom action)
★ Pinch 4 fingers - Home gesture
★ Swipe 3 fingers down - Back gesture
★ Swipe 3 fingers up - Bottom recent applications bar
★ Swipe 4 fingers up - Hide/Show status bar (experimental)
★ Custom gestures - create your own gestures to start any application, shortcut or custom action

THERE IS NO WAY TO ANSWER MARKET COMMENTS OR CONTACT COMMENTATOR - EMAIL ME IF YOU WANT ANSWER.
Please don't post your problems in market, email me or go post to XDA, thanks:
http://forum.xda-developers.com/showthread.php?t=1535740

If your device is listed as unsupported, please read FAQ in Help tab. If it still do not work, contact me by email: goodMoodDroid@gmail.com

Description: This application allows you to control tablet with gestures.
Swipe 4 fingers up to hide status bar. Do same gesture again to restore bar.
Swipe 4 fingers right to open previous application.
Swipe 4 fingers left to open next application.
Pinch with 4 fingers anywhere on screen to return to home screen from any application.
Swipe 3 fingers down to execute back action in any application.
Swipe 3 fingers up to show custom bottom bar with recent applications.
Expand 4 fingers anywhere on screen to open LaunchPad dialog. It is similar to SwypePad and allows start your most often used applications, shortcuts or custom actions anywhere anytime with simple gesture.
Works in all applications, games and browsers.
Application will use freed space when you hide status bar. Some games even work better with status bar hidden.
There is an option to switch to single touch gestures if its more convenient. You can even create your own gestures for any action.

Full version adds following features: option to hide notification icon, custom gestures and special actions, any number of actions in LaunchPad.

Tags: Hide bar, gesture, gestures, gesture control, gesturecontrol, status bar, system bar, full screen, Honeybar, ICS, SwypePad, iPad, GMD, G.M.D.


GMD GestureControl ★ root apk Videos and Images


Visit us on http://apkandroiddownloads.blogspot.com

download


Android Apk
Read More..

Friday, June 24, 2016

How to Root Galaxy S4 I9505 on Android 4 2 2 XXUDMH8 Jelly Bean Firmware


Samsung has rolled out the Android 4.2.2 Jelly Bean update with firmware build number I9505XXUDMH8 for the LTE version of Galaxy S4 with model number GT-I9505. The new official firmware is currently available in UK as an Over-The-Air (OTA) update as well as through Samsung KIES.

Samsung Galaxy S4 I9505 users who have already updated their devices with Android 4.2.2 XXUDMH8 Jelly Bean, may root their devices using the tutorial below.

This tutorial uses CF-Auto-Root file released by recognised XDA Developers, Chainfire. The CF-Auto-Root file allowing Galaxy S4 users to root their devices easily without depending on the firmware. It completely supports Android 4.2.2 Jelly Bean and future firmware as well. Head over to the CF-Auto-Root main thread to learn more about the root method.

Disclaimer: Rooting voids the warranty of your device. We and the developer of this rooting procedures shall not be held responsible if any undesirable outcomes may happen to your device. use of this root guide is solely at your own risk!

Pre-requisites
1. Install USB Drivers for Samsung Galaxy S4 on the computer.
2. Enable USB Debugging Mode on the phone by navigating to Settings >> Developer Options.
3. Make a backup of all your important data before following the guide.
4. The Galaxy S4 should be factory unlocked and not locked to any particular carrier.
5. Ensure the battery of the phone is charged more than 80 percent.
6. The CF-Auto-Root file works only on Samsung Galaxy S4 I9505. Applying this to any incorrect variant might brick the device. Verify the model number of the Galaxy S4 by navigating to Settings >> About Phone.

File Required
1. CF-Auto-Root for Galaxy S4 I9505 (CF-Auto-Root-jflte-jfltexx-gti9505.zip)
2. Odin 3.07

Steps to Root Galaxy S4 I9505 Running on Android 4.2.2 XXUDMH8 Jelly Bean Firmware
Step 1: Extract CF-Auto-Root and Odin 3.07 files using winrar/7zip/winzip or any other extracting tool.
Step 2: Switch off the Galaxy S4. Then boot the device into Download Mode by pressing and holding Volume Down, Home and Power buttons together until a construction Android robot icon with a warning triangle appears on screen. Now press the Volume Up button to enter Download Mode.
Step 3: Launch Odin on the computer as an Administrator.
Step 4: Connect the Galaxy S4 to the computer using USB cable while it is in the Download Mode. Wait until Odin detects the device. When the device is connected successfully, the ID: COM box will turn to light blue with the COM port number. Additionally, the successful connected will be indicated by a message saying Added.

Note: If the Added message does not appear, then try re-install USB drivers or changing the port on the computer.

Step 5: In Odin, click the PDA button and select the CF-Auto-Root-jflte-jfltexx-gti9505.tar.md5 file.
Step 6: Verify that Auto Reboot and F.Reset Time checkboxes are selected in Odin. Also, ensure the Re-Partition option is not selected.
Step 7: Double-check and click Start in Odin. The installation process will now begin.
Step 8: Once the installation process is completed, your phone will restart and soon you will see a PASS message with green background in the left-most box at the very top of the Odin. You can now unplug the USB cable to disconnect your device from computer.

Samsung Galaxy S4 I9505 running on Android 4.2.2 XXUDMH8 Jelly Bean firmware is now rooted successfully. You can now install any app that requires root permission. Verify the root status of the device by downloading Root Checker app from Google Play Store.

Thanks to all fellas at XDA who first tried out this rooting technique. This method was originally posted via XDA-Developers original thread.


Android Apk
Read More..

Tuesday, June 14, 2016

How to Root Galaxy S4 I9500 on Android 4 2 2 XWUBMG5 Jelly Bean Firmware


The Exynos 5 octa-core variant of Samsung Galaxy S4 (GT-I9500) has received a new software update with firmware build number I9500XWUBMG5. The new software update is still based on Android 4.2.2 Jelly Bean version and now available in India, Nepal, Sri Lanka, and Bangladesh.

Samsung Galaxy S4 I9500 users who have already updated their devices with Android 4.2.2 XWUBMG5 Jelly Bean, may root their devices using the tutorial below.

This tutorial uses CF-Auto-Root file released by recognised XDA Developers, Chainfire. The CF-Auto-Root file allowing Galaxy S4 users to root their devices easily without depending on the firmware. It completely supports Android 4.2.2 Jelly Bean and future firmware as well. Head over to the CF-Auto-Root main thread to learn more about the root method.

Disclaimer: Rooting voids the warranty of your device. We and the developer of this rooting procedures shall not be held responsible if any undesirable outcomes may happen to your device. use of this root guide is solely at your own risk!

Pre-requisites
1. Install USB Drivers for Samsung Galaxy S4 on the computer.
2. Enable USB Debugging Mode on the phone by navigating to Settings >> Developer Options.
3. Make a backup of all your important data before following the guide.
4. The Galaxy S4 should be factory unlocked and not locked to any particular carrier.
5. Ensure the battery of the phone is charged more than 80 per cent.
6. The CF-Auto-Root file works only on Samsung Galaxy S4 I9500. Applying this to any incorrect variant might brick the device. Verify the model number of the Galaxy S4 by navigating to Settings >> About Phone.

File Required
1. CF-Auto-Root for Galaxy S4 I9500 (CF-Auto-Root-ja3g-ja3gxx-gti9500.zip)
2. Odin 3.07

Steps to Root Galaxy S4 I9500 Running on Android 4.2.2 XWUBMG5 Jelly Bean Firmware
Step 1: Extract CF-Auto-Root and Odin 3.07 files using winrar/7zip/winzip or any other extracting tool.
Step 2: Switch off the Galaxy S4. Then boot the device into Download Mode by pressing and holding Volume DownHome and Power buttons together until a construction Android robot icon with a warning triangle appears on screen. Now press the Volume Up button to enter Download Mode.
Step 3: Launch Odin on the computer as an Administrator.
Step 4: Connect the Galaxy S4 to the computer using USB cable while it is in the Download Mode. Wait until Odin detects the device. When the device is connected successfully, the ID: COM box will turn blue with the COM port number. Additionally, the successful connected will be indicated by a message saying Added.
Note: If the Added message does not appear, then try re-install USB drivers or changing the port on the computer.
Step 5: In Odin, click the PDA button and select the CF-Auto-Root-ja3g-ja3gxx-gti9500.tar.md5 file.
Step 6: Verify that Auto Reboot and F.Reset Time checkboxes are selected in Odin. Also, ensure the Re-Partition option is not selected.
Step 7: Double-check and click Start in Odin. The installation process will now begin.
Step 8: Once the installation process is completed, your phone will restart and soon you will see a PASS message with green background in the left-most box at the very top of the Odin. You can now unplug the USB cable to disconnect your device from computer.

Samsung Galaxy S4 I9500 running on Android 4.2.2 XWUBMG5 Jelly Bean firmware is now rooted successfully. You can now install any app that requires root permission. Verify the root status of the device by downloading Root Checker app from Google Play Store.

Thanks to all fellas at XDA who first tried out this rooting technique. This method was originally posted via XDA-Developers original thread.


Android Apk
Read More..

Tuesday, April 12, 2016

Font Installer Root v1 0 Download APK

Font Installer *Root* v1.0


Description
This app allows you to choose between hundreds of fonts to apply to your whole device. You must be rooted with busybox installed. If you do not know what "root" is please dont download this app or rate poorly.

Features include:
- Hundreds of fonts to install with previews
- Download/load fonts in background
- Preview fonts page w/ swipe gestures to switch between previews
- Install any font from your SD card
- Backup/Restore system fonts
- Choose which system fonts to override
- Set the install & download path
- Hot reboot (fast reboot)

Donate Users (get license for 99 cents):
- Select font favorites
- Remove ads


https://sites.google.com/site/freeapkandroidapps3/Market_3.4.4.apk


Android Apk
Read More..

Wednesday, March 23, 2016

How to Root Galaxy S3 I9300 on Android 4 3 Jelly Bean Firmware


The International version of Samsung Galaxy S3 with model number GT-I9300 has received Android 4.3 Jelly Bean update firmware. The new official firmware is currently available as an Over-The-Air (OTA) update as well as through Samsung KIES.

Samsung Galaxy S3 I9300 users who have already updated their devices with Android 4.3 Jelly Bean, may root their devices using the tutorial below.

This tutorial uses CF-Auto-Root file released by Elite Recognized XDA Developers, Chainfire. The CF-Auto-Root file allowing Galaxy S3 users to root their devices easily without depending on the firmware. It completely supports Android 4.3 Jelly Bean and future firmware as well. Head over to the CF-Auto-Root main thread to learn more about the root method.

Disclaimer: Rooting voids the warranty of your device. We and the developer of this rooting procedures shall not be held responsible if any undesirable outcomes may happen to your device. use of this root guide is solely at your own risk!

Pre-requisites
1. Install USB Drivers for Samsung Galaxy S3 on the computer.
2. Enable USB Debugging Mode on the phone by navigating to Settings >> Developer Options.
3. Make a backup of all your important data before following the guide.
4. The Galaxy S3 should be factory unlocked and not locked to any particular carrier.
5. Ensure the battery of the phone is charged more than 80 percent.
6. The CF-Auto-Root file works only on the international version of Samsung Galaxy S3 (GT-I9300). Applying this to any incorrect variant might brick the device. Verify the model number of the Galaxy S3 by navigating to Settings >> About Phone.

File Required
1. CF-Auto-Root for Galaxy S3 I9300 (CF-Auto-Root-m0-m0xx-gti9300.zip)
2. Odin 3.07

Steps to Root Galaxy S3 I9300 Running on Android 4.3 Jelly Bean Firmware
Step 1: Extract CF-Auto-Root and Odin 3.07 files using winrar/7zip/winzip or any other extracting tool.
Step 2: Switch off the Galaxy S3. Then boot the device into Download Mode by pressing and holding Volume Down, Home and Power buttons together until a construction Android robot icon with a warning triangle appears on screen. Now press the Volume Up button to enter Download Mode.
Step 3: Launch Odin on the computer as an Administrator.
Step 4: Connect the Galaxy S3 to the computer using USB cable while it is in the Download Mode. Wait until Odin detects the device. When the device is connected successfully, the ID: COM box will turn to light blue with the COM port number. Additionally, the successful connected will be indicated by a message saying Added.

Note: If the Added message does not appear, then try re-install USB drivers or changing the port on the computer.

Step 5: In Odin, click the PDA button and select the CF-Auto-Root-m0-m0xx-gti9300.tar.md5 file.
Step 6: Verify that Auto Reboot and F. Reset Time checkboxes are selected in Odin. Also, ensure the Re-Partition option is NOT selected.
Step 7: Double-check and click Start in Odin. The installation process will now begin.
Step 8: Once the installation process is completed, your phone will restart and soon you will see a PASS message with green background in the left-most box at the very top of the Odin. You can now unplug the USB cable to disconnect your device from computer.

Samsung Galaxy S3 I9300 running on Android 4.3 Jelly Bean firmware is now rooted successfully. You can now install any app that requires root permission. Verify the root status of the device by downloading Root Checker app from Google Play Store.

Thanks to all fellas at XDA who first tried out this rooting technique. This method was originally posted via XDA-Developers original thread.


Android Apk
Read More..

Friday, March 18, 2016

How to Root Galaxy S4 I9505G on Android 4 3 Jelly Bean Firmware


Google has released the official Android 4.3 Jelly Bean update for the Google Play Edition of the Samsung Galaxy S4 (GT-I9505G).

Samsung Galaxy S4 I9505G users who have already updated their devices with Android 4.3 Jelly Bean, may root their devices using the tutorial below.

This tutorial uses CF-Auto-Root file released by recognised XDA Developers, Chainfire. The CF-Auto-Root file allowing Galaxy S4 users to root their devices easily without depending on the firmware. It completely supports Android 4.3 Jelly Bean and future firmware as well. Head over to the CF-Auto-Root main thread to learn more about the root method.

Disclaimer: Rooting voids the warranty of your device. We and the developer of this rooting procedures shall not be held responsible if any undesirable outcomes may happen to your device. use of this root guide is solely at your own risk!

Pre-requisites
1. Install USB Drivers for Samsung Galaxy S4 on the computer.
2. Enable USB Debugging Mode on the phone by navigating to Settings >> Developer Options.
3. Make a backup of all your important data before following the guide.
4. The Galaxy S4 should be factory unlocked and not locked to any particular carrier.
5. Ensure the battery of the phone is charged more than 80 percent.
6. The CF-Auto-Root file works only on Samsung Galaxy S4 I9505G. Applying this to any incorrect variant might brick the device. Verify the model number of the Galaxy S4 by navigating to Settings >> About Phone.

File Required
1. CF-Auto-Root for Galaxy S4 I9505G (CF-Auto-Root-jgedlte-jgedlteue-gti9505g.zip)
2. Odin 3.07

Steps to Root Galaxy S4 I9505G Running on Android 4.3 Jelly Bean Firmware
Step 1: Extract CF-Auto-Root and Odin 3.07 files using winrar/7zip/winzip or any other extracting tool.
Step 2: Switch off the Galaxy S4. Then boot the device into Download Mode by pressing and holding Volume Down, Home and Power buttons together until a construction Android robot icon with a warning triangle appears on screen. Now press the Volume Up button to enter Download Mode.
Step 3: Launch Odin on the computer as an Administrator.
Step 4: Connect the Galaxy S4 to the computer using USB cable while it is in the Download Mode. Wait until Odin detects the device. When the device is connected successfully, the ID: COM box will turn to light blue with the COM port number. Additionally, the successful connected will be indicated by a message saying Added.

Note: If the Added message does not appear, then try re-install USB drivers or changing the port on the computer.

Step 5: In Odin, click the PDA button and select the CF-Auto-Root-jgedlte-jgedlteue-gti9505g.tar.md5 file.
Step 6: Verify that Auto Reboot and F.Reset Time checkboxes are selected in Odin. Also, ensure the Re-Partition option is not selected.
Step 7: Double-check and click Start in Odin. The installation process will now begin.
Step 8: Once the installation process is completed, your phone will restart and soon you will see a PASS message with green background in the left-most box at the very top of the Odin. You can now unplug the USB cable to disconnect your device from computer.

Samsung Galaxy S4 I9505G running on Android 4.3 Jelly Bean firmware is now rooted successfully. You can now install any app that requires root permission. Verify the root status of the device by downloading Root Checker app from Google Play Store.

Thanks to all fellas at XDA who first tried out this rooting technique. This method was originally posted via XDA-Developers original thread.


Android Apk
Read More..

Thursday, January 28, 2016

How to Root Galaxy S4 I9500 on Android 4 2 2 XXUBMG9 Jelly Bean Firmware


A new software update based on Android 4.2.2 Jelly Bean with firmware build number I9500XXUBMG9 has been rolled out on Samsung Galaxy S4 with model number GT-I9500.

Samsung Galaxy S4 I9500 users who have already updated their devices with Android 4.2.2 XXUBMG9 Jelly Bean, may root their devices using the tutorial below.

This tutorial uses CF-Auto-Root file released by recognised XDA Developers, Chainfire. The CF-Auto-Root file allowing Galaxy S4 users to root their devices easily without depending on the firmware. It completely supports Android 4.2.2 Jelly Bean and future firmware as well. Head over to the CF-Auto-Root main thread to learn more about the root method.

Disclaimer: Rooting voids the warranty of your device. We and the developer of this rooting procedures shall not be held responsible if any undesirable outcomes may happen to your device. use of this root guide is solely at your own risk!

Pre-requisites
1. Install USB Drivers for Samsung Galaxy S4 on the computer.
2. Enable USB Debugging Mode on the phone by navigating to Settings >> Developer Options.
3. Make a backup of all your important data before following the guide.
4. The Galaxy S4 should be factory unlocked and not locked to any particular carrier.
5. Ensure the battery of the phone is charged more than 80 percent.
6. The CF-Auto-Root file works only on Samsung Galaxy S4 I9500. Applying this to any incorrect variant might brick the device. Verify the model number of the Galaxy S4 by navigating to Settings >> About Phone.

File Required
1. CF-Auto-Root for Galaxy S4 I9500 (CF-Auto-Root-ja3g-ja3gxx-gti9500.zip)
2. Odin 3.07

Steps to Root Galaxy S4 I9500 Running on Android 4.2.2 XXUBMG9 Jelly Bean Firmware
Step 1: Extract CF-Auto-Root and Odin 3.07 files using winrar/7zip/winzip or any other extracting tool.
Step 2: Switch off the Galaxy S4. Then boot the device into Download Mode by pressing and holding Volume Down, Home and Power buttons together until a construction Android robot icon with a warning triangle appears on screen. Now press the Volume Up button to enter Download Mode.
Step 3: Launch Odin on the computer as an Administrator.
Step 4: Connect the Galaxy S4 to the computer using USB cable while it is in the Download Mode. Wait until Odin detects the device. When the device is connected successfully, the ID: COM box will turn blue with the COM port number. Additionally, the successful connected will be indicated by a message saying Added.

Note: If the Added message does not appear, then try re-install USB drivers or changing the port on the computer.

Step 5: In Odin, click the PDA button and select the CF-Auto-Root-ja3g-ja3gxx-gti9500.tar.md5 file.
Step 6: Verify that Auto Reboot and F.Reset Time checkboxes are selected in Odin. Also, ensure the Re-Partition option is not selected.
Step 7: Double-check and click Start in Odin. The installation process will now begin.
Step 8: Once the installation process is completed, your phone will restart and soon you will see a PASS message with green background in the left-most box at the very top of the Odin. You can now unplug the USB cable to disconnect your device from computer.

Samsung Galaxy S4 I9500 running on Android 4.2.2 XXUBMG9 Jelly Bean firmware is now rooted successfully. You can now install any app that requires root permission. Verify the root status of the device by downloading Root Checker app from Google Play Store.

Thanks to all fellas at XDA who first tried out this rooting technique. This method was originally posted via XDA-Developers original thread.


Android Apk
Read More..

Saturday, January 10, 2015

Use this to root Android DiGiX TAB 730 Uploaded by T3CUMS3H

Use this to root Android DiGiX TAB 730 Uploaded by T3CUMS3H

Type : torre
Size : 1 KB
Artis :
Android Download
Rating :


Search Result


Download Use this to root Android DiGiX TAB-730 -Uploaded by ...
Direct Download! Use this to root Android DiGiX TAB-730 -Uploaded by T3CUMS3H - might also be available on usenet.

digix tab-730 [Archive] - FreakTab.com
This, update ( .Android 4.0.4 Firmware for TAB-730 (ftp://yaoxl:123456@121.15.134.85/Tablet/Upload/TAB730-v1.10-20120929.zip)) is a lot better than what came stock.

digix tab-730
Digix now has 4.0.4 update. About to text with livesuite. ... This, update ( . Android 4.0.4 Firmware for TAB-730 ) is a lot better than what came stock. I, can ...

Page 1 of comments on Digix TAB-730 7 Inch Android 4.0 Tablet ...
Upload. Search . Guide Popular on YouTube; Music; Sports; Gaming; Movies; TV Shows; News; Spotlight; No channels found Loading subscriptions Channels for you ...

How to Update Tab-730g For Free View or Download - PCRepairbook.com
Digix TAB-730 and TAB ... with me but for now I can live How can i root sophix tablet 7 with android 4.0.4 ... HOSTED IN THIS SERVER NOR UPLOADED BY ME IN ...

Digix Root Tutorial - YouTube
This is just a short tutorial to show you how to Root your Digix tablets. ... 5:17 Digix TAB-730 7" tablet unboxing by ... 10:36 How To Use Android 4 ...

How Do I Update My Tab-840g Sophix For Free View or Download ...
How To Update Sophix Tab 840g For Free View or Download at , Lg 840g Manual For Free View or Download at PCRepairbook.com, digix sophix 8" tablet root 840g

M7206 Upgrade | Android App, Android Smartphone Reviews, Gadget ...
lol sorry first part of the video did not upload dunno why ... tablet android root - 2013 TRek madone 5 2 review - digix tab 730 root - tmobile zte ...

Ttfsub Gpd Download Free Download 69 Files | Android App, Android ...
Never fear any longer, the familiar android application developer Farbot Mobile happily present Undelete Beta Android Application.

Video Categories
See more videos uploaded by : Download. ... Here is a quick peek at the Digix Media Tab-1030 that I came across ... Tablet pc GoClever Tab T75 Android 4.0.3. ice ...


Description


See more videos uploaded by : Download. ... Here is a quick peek at the Digix Media Tab-1030 that I came across ... Tablet pc GoClever Tab T75 Android 4.0.3. ice ...,Never fear any longer, the familiar android application developer Farbot Mobile happily present Undelete Beta Android Application.,lol sorry first part of the video did not upload dunno why ... tablet android root - 2013 TRek madone 5 2 review - digix tab 730 root - tmobile zte ...,How To Update Sophix Tab 840g For Free View or Download at , Lg 840g Manual For Free View or Download at PCRepairbook.com, digix sophix 8" tablet root 840g,This is just a short tutorial to show you how to Root your Digix tablets. ... 5:17 Digix TAB-730 7" tablet unboxing by ... 10:36 How To Use Android 4 ...,Digix TAB-730 and TAB ... with me but for now I can live How can i root sophix tablet 7 with android 4.0.4 ... HOSTED IN THIS SERVER NOR UPLOADED BY ME IN ...,Upload. Search . Guide Popular on YouTube; Music; Sports; Gaming; Movies; TV Shows; News; Spotlight; No channels found Loading subscriptions Channels for you ...,Digix now has 4.0.4 update. About to text with livesuite. ... This, update ( . Android 4.0.4 Firmware for TAB-730 ) is a lot better than what came stock. I, can ...,This, update ( .Android 4.0.4 Firmware for TAB-730 (ftp://yaoxl:123456@121.15.134.85/Tablet/Upload/TAB730-v1.10-20120929.zip)) is a lot better than what came stock.,Direct Download! Use this to root Android DiGiX TAB-730 -Uploaded by T3CUMS3H - might also be available on usenet.


Similar Post


  • aaAndroid Pack
  • OfficeSuite Pro 7 Plus PDF and HD v7 0 1166 AnDrOiD
  • ExtremeDevelopers CarArmageddon2012 lite 1
  • com audiogalaxy 1 apk
  • Top Paid Android Apps September 2012 Part 6
  • Bang Bang Racing 1 0
  • Android 4 1 to Android 4 2 Stable Working photosphere
  • AK Must Have Android Paid Games All Devices rar 005
  • com dualboot apps springzen 3
  • fvKzd8U 1 47 Android


Read More..